Wednesday, June 30, 2010

Fourth of July Activities

With summer in full swing we are spending 99.9% of our time outside (or so it seems!). Truth be told, I've been purposely lax about our school time lately because this time of year is always so busy for us - lots of time spent with friends, family and in the ocean! Still, I always make sure to have a handful of trays on our shelves because James *loves* to learn! He is going through such a sensitive period for learning right now -- day after day he blows us away with his thoughts, ideas and new-found knowledge of the world. It's SO much fun being his mommy!

Here are some activities I put together in honor of America's Independence Day. Hooray for red, white and blue! :)

Practical Life

Spooning red beads When I set up James' activities I always make sure to arrange the material so he can transfer it from left to right, which simulates how we read. James calls these little beads "cherries". :) I found them at our local craft store.

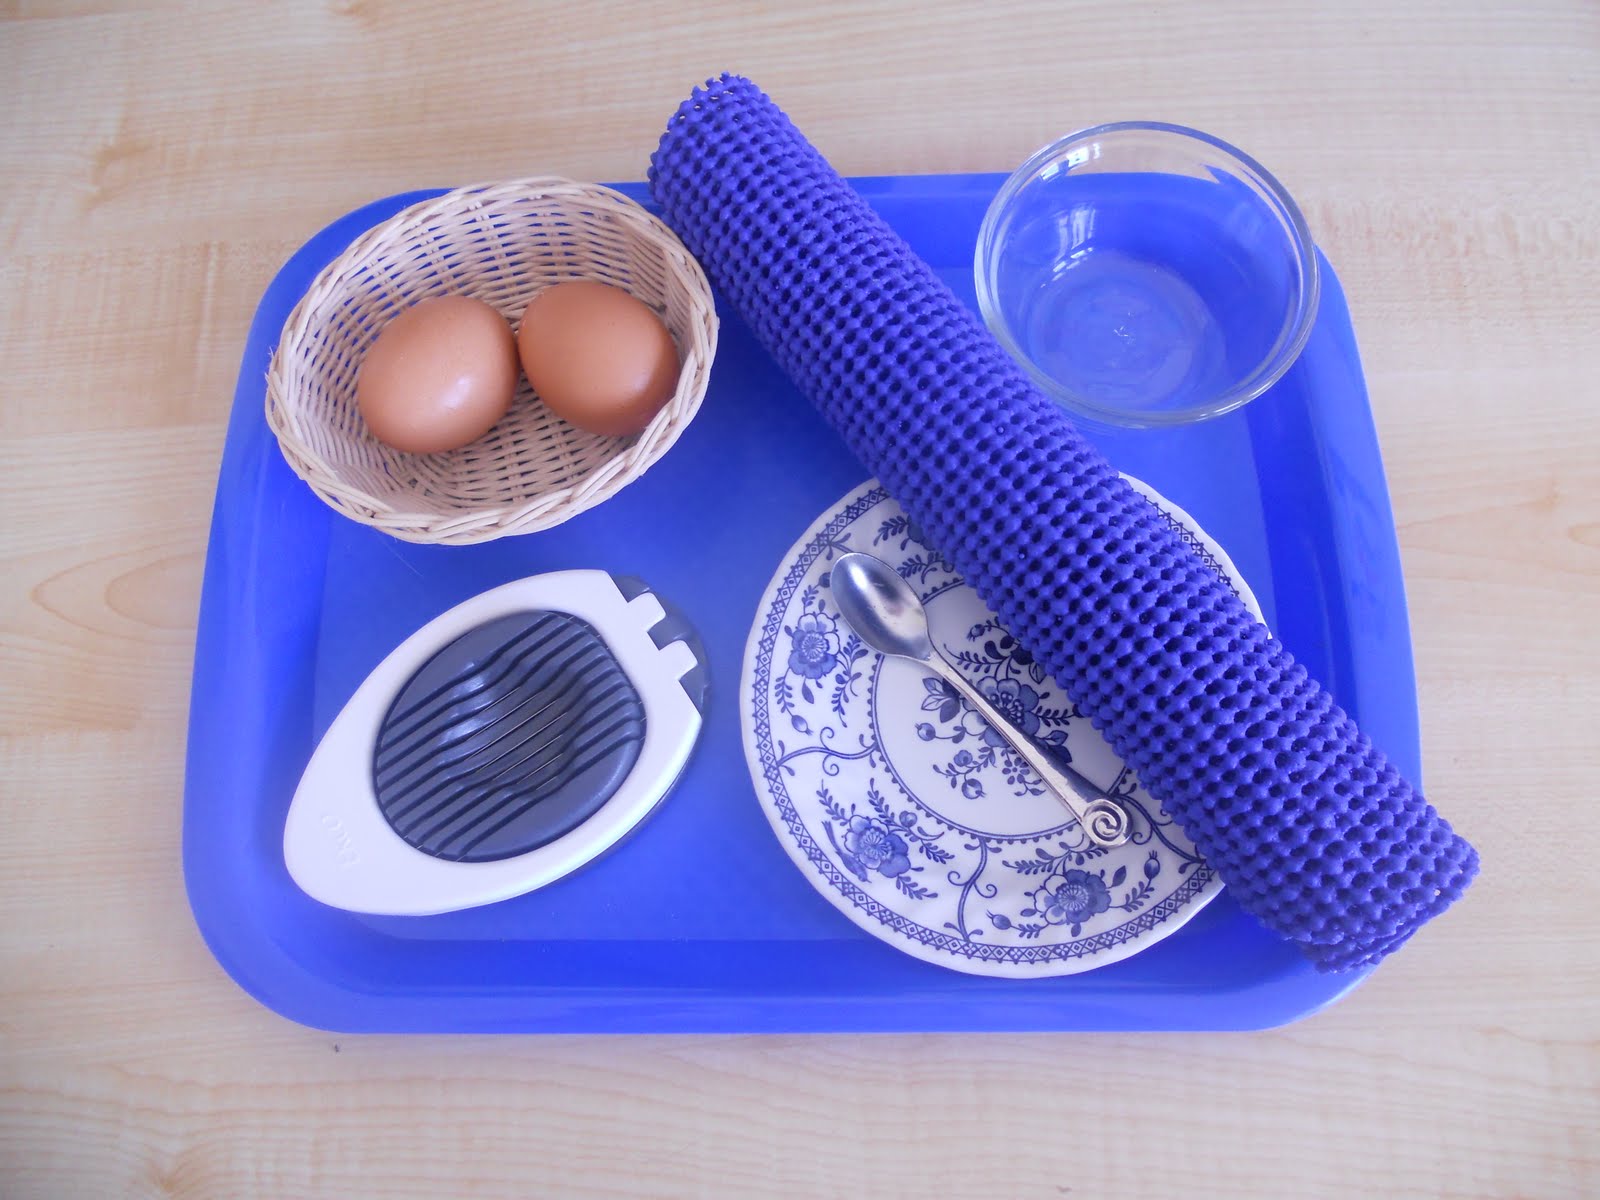
Pouring water from a pitcher into four cups
I just *love* this pouring set. It's hard to see in the photo, but the design combined with the cobalt blue color makes for such an inviting activity. James was SO careful with these. I didn't have to remind him to be careful - it's as though he just knew he should be. I believe this is what comes of allowing children to use breakable materials.

Tweezing and transferring puffs
It took a bit for James to get the "press, pinch, hold and release" technique of tweezing down pat, but when he did he worked on this activity for quite a well. He loved the little clear box the puffs "lived in". :)

Transferring ice cube stars These stars are filled with water and are meant to be frozen and used as in drinks (I found them at Michael's). James created a repeating red, white and blue pattern and shook each and every star in the process. He said they sounded wet!

Plucking flowers
This is a good fine motor activity. I found a cheap bunch of fake flowers (at Micheal's) and showed James how to pinch the flowers off of the stem. I spoke for a moment about how it's not a good idea to do this to real flowers because they're still growing. He liked this activity and worked on it here and there for a few days.

Sensory
Our sensory tub and playdough were a HUGE hit!

Size sequencing stars
I created these stars in Word and then printed and laminated them. You can find a link to download this here on my printables page.

Language
We read a couple of patriotic books - F is for Flag, and L is for Liberty. Both of these are really good, very factual, yet easy to read and for children to understand. James really enjoyed these books.

Another book we had on hand is America: A Patriotic Primer. I love this one - it's packed with details and fun facts and it lists the topics in alphabetical order, e.g. L is for Lincoln, E is for Equality, etc. Each page is full of detailed illustrations, which really captured James' attention.

I found this printable here. Inside the little box are flat sided marbles which James matched up with the circles on the flag. The control of error was that here were just enough blue marbles for the stars and red marbles for the stripes.

Memory matching US symbols
This activity was a great way to introduce some new topics and vocabulary words to James, such as Statue of Liberty and Liberty Bell. I think I printed these off from abcteach.com.

Math

Flag game I created this game for James and WOW did he get such a kick out of it! Inside the small tray are enough star-shaped beads for as many dots are on any given side of the dice. James rolls the dice and if, say, he rolls a five, he'd remove five beads from the tin and place them in the empty blue section of the flag. Like I said, James loved this and easily worked through each number. Since this wasn't as challenging for him as I thought it would be, I adapted it be a simple addition/subtraction game. For example, when James rolled five and added five beads to the flag, and then on the next turn he rolled a three, I taught him to remove two beads to get the three he needed. You can find a link to download this here on my printables page.

Star sticker numbers
I made these cards in Word, printed and laminated them. Each card has a number and James will stick the appropriate number of star stickers on each card. The fact that the cards are laminated means they're reusable - yay! You can find a link to download this here on my printables page.

Culture & Geography

Flag pushing Another great fine motor activity. I found these flag toothpicks at the dollar store and the Styrofoam block at the craft store. James was thrilled about this - I think I put about 50 flag picks in that bowl and he pushed each and every one into the foam block.

James' love for his USA puzzle has reached a new level - he plays with it all. the. time. He will work on it from start to finish and calls off the states he knows and asks for names of those he doesn't. The other day he had the puzzle nearly complete with the exception of one piece. He said to me, "Mama, I can't find Wisconsin! Minnesota will miss it - let's find it! Hurry!". :D

You can download my Fourth of July printables by clicking on these links:
Star Sequencing
Sticker Flags
Flag Game
Calendar Cards

As always, my printables are available for your personal use only - please do not sell or offer them in a giveaway. Thank you!

I'm linking this post up to Montessori Monday, The Preschool Corner and What My Child is Reading - check out these links for more activities!

Alphabet Box Giveaway Winner

First, I just want to say thank you to everyone who enthusiastically entered my Alphabet Box giveaway. You blew me away with your kind, helpful and entertaining comments. :) I had no idea this was going to be such a hit and it makes me sad that I'm unable to giveaway more than just this one set.

So, without further ado, I'm thrilled to announce that the winner of the Alphabet Box giveaway is #152...


Congratulations!! I'll be emailing you in the coming days to get your shipping address. :)

Monday, June 28, 2010

July Sensory Tub & Playdough - Red, White & Blue

Ok, I'm jumping ahead a bit by posting this in June, but I never got around to making a June tub and this one is actually themed for the 4th of July, so there you go. :)

Sensory Tub
This was a bit hard to photograph because there are so many sparkly light reflective things in this tub!

Here's what's inside:
:: LOTS of red and blue pony beads
:: White star-shaped beads
:: Red, white and blue puffs
:: Tiny red, white and blue flowers
:: Sparkly red, white and blue chenille sticks twisted around one another to look like fireworks. Hubs tells me they look like fireworks, but I wonder if they look a bit more like patriotic spiders?
:: Bits of the chenille sticks cut up into 1" pieces
:: Containers - one for pouring and one for collecting
:: A spoon for scooping

James was SO excited about this tub!! He reaaaallly liked the "fireworks" and kept holding them up and saying "BOOM!"

Playdough
I wasn't able to get the dark blue and red I was aiming for, but it's all good. :) The white ball has red, white and blue glitter mixed into it.

This is the recipe I use for the playdough. Be sure to keep your homemade dough sealed in an airtight container and kept in the refrigerator. Sadly, we can only play with ours for 30 minutes at a time. Beyond that and it starts to get gooey thanks to the humidity.

**PS: Don't forget to enter my Alphabet Box giveaway going on until 6/29!!**

Sunday, June 27, 2010

Completed Craft Hope Project

I knitted a bundle of washcloths and sent them to Pensacola to aid in the clean up of the animals affected by the he Gulf Coast Oil Spill. The good people at Craft Hope hosted this project. I wish time permitted me to knit more!

The deadline for sending in washcloths is July 3rd, so if you're quick you can still make and send some things in. Otherwise, they'll still willingly accept donations and use them for other Coastal Wildlife Refuges.

Thursday, June 24, 2010

The Alphabet Box - Part II (& Giveaway!)


~This giveaway is now closed~

~click here for Part I~

As promised, here's Part II to The Alphabet Box. In this post I'll share how we use our box for learning & fun and I'll also have a giveaway at the end. :)

When I first introduced the drawers to James, I focused on one drawer at a time. I'd lay out all the objects on a mat and as I called out the name of each object I'd emphasize the sound of the letter, (e.g. "this is a ssssnake"). James would repeat the names after me and after we'd gone through each object I'd say, "All of these objects begin with the sound 's'."

After James had learned a handful of sounds, I put together a few games. The first was a "Seek and Find" game. I'd randomly place all the objects from 2-3 drawers on the mat and ask him to find an object that began with one of the letters. He'd find it and line it up under the appropriate letter.

James' favorite game is the "Please Bring Me" game. I place some objects (from two trays) on a shelf across the room and ask James to bring to me something that begins with the "t" sound (for example). When he brings back with the correct object I ask him to name it. I confirm the name and making note of the sound, e.g. "Yes, that's a tree. Can you hear the "t" sound in the word 'tree'?"

Another fun game to play with the alphabet box is "I Spy". I put several objects from various drawers on a tray and I'll say, "I spy with my little eye something that begins with the "b" sound." James will then find the object and name it.

Once we start working with our sandpaper letters, my intent is to combine the objects and letters together.
This is really just a variation to the "seek and find" game. The difference being that we'd be working with 10-12 letters at a time and that James will first trace and say the sound of the letter and then he'll need to find the object that matches that sound. The challenge is that there are many more objects and letters to choose from. This activity also has a sensory element to it (touching the sandpaper).

Now for the giveaway!
{I'm so excited about this and I hope you are, too!}

I think the alphabet box is such a fantastic learning tool and I truly believe all homeschoolers and teachers should have one. I've given you tips and ideas on how to create your own, but I'd love to help you even more. So, I'm going to give away to one person all of the following...

~Letter cards in both upper and lowercase and ONE object for each letter~
(Note: objects are exactly as shown above and the coins are Bermudian currency.)

You'll have 6 chances to win - simply leave me one comment per day until the end of the giveaway, which is at midnight (ADT) on July 29th. This giveaway is open to anyone anywhere! (Yes, that includes you, my lovely reader in Qatar.) :)

** Please be sure to include your email address if it's not public in your profile!! **

Monday, June 21, 2010

The Alphabet Box - Part I

~click here for Part II~

Several of you have written to me asking about our alphabet box - what's in it, where did I find the little objects, how we use it. I'm more than happy to finally answer your questions! In fact, I can't believe I haven't devoted a post to it sooner because it really is such a fun learning tool.

::For those of you who don't know, an alphabet box or sound pouch* is simply a tool used to teach children sound recognition by using pictures and/or objects. There's a container for each letter and inside each container are about 6 (give or take a few) objects, each beginning with the sound of that letter.::

I've decided to split my answers to your questions into two posts. I tried writing everything in just one post and it was just way too long. So, first, I'll share what's in our box - yes, that means there are lots of pictures for you to look through. :) I'll also give you some ideas and resources for where you can find your own teeny tiny goodies and how you can create your own alphabet box. Finally, in Part II, I'll explain how we use our box for learning and I'll have a little giveaway (click here for the giveaway!), as well!

Here we go...

The contents of our box, from A to Z...

A: apple, astronaut, alphabet, alligator, ant
B: ball, bowl, butterfly, bird, book (Bible), banana, buffalo, bee

C: car, cork, cat, cow, card, candlestick, clock, crab
D: duck, dog, dice, dolphin, dinosaur

E: egg, Eskimo, elephant, envelope, eight
F: feather, fence, frog, flag, fish, flower, football, flipper

G: golfclub, gorilla, guitar, grapes, gold
H: house, hat, heart, hen, hand, hanger, horn

I: igloo, Indian, in
J: jack, jewels, jug, jar

K: kettle, kite, kangeroo, key
L: lanturn, lobster, lamb, lid, leather, leaf, lego

M: monkey, mouse, moose, marble, milk, millipede, mug
N: nail, needle, nine, nickle, nut

O: octopus, olive, otter, octagon
P: pumpkin, penny, piano, present, pig, pin

Q: queen, question mark, quartz, quilt, quarter
R: ruler, ribbon, ring, rabbit, rose, rock

S: spring, sponge, spider, snowflake, stamp, sun, spoon, sunglasses, strawberry, star, sewing machine, spool
T: tiger, triangle, tree, trumpet, turtle, two

U: underwear, umbrella, (James') uncle :)
V: violin, valentine, vase, vacuum

W: wagon, whale, watermelon, wood, wheel, walnut, walrus
X: ax, fox, box, wax, x-ray

Y: yellow, yak, yarn
Z: zero, zipper, zebra, zig-zag

Next I'll share some tips, resources and ideas on how to make your own alphabet box.

First, the sounds:
Before you begin searching for fun little objects, I recommend you read the little chart I've created below so you know the proper phonetic sound pronunciations for each letter. You may have the cutest little orange for your O drawer, but it won't work because the phonetic sound for O is quite different. Momtessori posted a helpful video of the sounds, so give that a quick look as well.

a - apple
b - bat
c - cat
d - dog
e - elf
f - frog
g - gum
h - hat
i - igloo
j - jet
k - kite
l - lemon
m - mom
n - nut
o - octopus
p - pig
q - queen (sounds like kw)
r - rat
s - snake
t - teacher
u - umbrella
v - violin
w - watermelon
x - box (sounds like cks)
y - yogurt
z - zipper

Second, the box:
I found ours in the tool section of our version of a Lowes. It's one of those multi-compartment units used for storing nuts and bolts and the like, which you can find at almost any hardware store. Sadly, gray was the only color option I had. I tried to jazz it up with letter stickers from my scrapbooking stash. :)

*You don't need to limit yourself to a box - if you're crafty and willing to devote some time, why not make individual sound pouches, one for each letter? Jojoebi did an amazing job at this - check out her photo stream here. It's my hope to eventually transfer out of the box and into some homemade pouches. They look so much nicer!

Third, the contents:
You'll want to create small letter cards for each drawer. I think it's important to create a card for both capital and lowercase. Here are some options:
  • I've uploaded a free template for you that has the proper font (e.g. the letter 'a' is written as a child learns it and not as it appears in the font I'm using on this blog) - click here for that template.
  • Another idea is to use letter stickers and just apply them onto cardstock.
  • Or, instead of making cards, you can use puzzle letters, foam letters, magnetic letters or letter beads.
  • Also look at a scrapbooking store for alphabet embellishments - I'm thinking wood chips, die cuts, brads, buttons... you'd be surprised at how versatile scrapbooking materials can be!
Now, as to the tiny objects. I'm a collector (read: pack rat) by nature and it just so happens I LOVE miniatures, so creating an alphabet box of our own was just way too much fun for me!! That said, I already had quite of few of these things on hand - and I'm willing to bet you do, too!
  • Take a look through your children's toys (look to Barbies for those little hats, gloves and jackets), your tool box, your craft drawer, your office supplies, your junk drawer, your board games. Once you get started you won't be able to stop hunting for these little treasures!
  • You can also make many of these things yourself. For example, I knitted that little apple and hat and sewed the quilt and the underwear. I needle felted the olive and crafted the box, the envelope, the alphabet and the valentine. Be creative!
  • You could certainly make it very easy on yourself and simply find clip art for everything. Just print and go! I chose to do this for things I couldn't find. An excellent resource for school friendly clip art is abcteach.com. This is an amazing site with much, much more than clip art. You'll need a membership to access most things, but believe me when I tell you the membership is sooo worth it!
  • When in doubt, buy it! My two favorite resources for miniatures are Montessori Services - click here to see their full list of language objects and Safari Ltd. for their amazing Toobs - you can buy these on Amazon, but I've seen them in stores like Michael's Crafts and Target. Another great resource is Lakeshore Learning - they have this fantastic set. One of my readers told me about this collection. Both sets looks very appealing, but are a little too pricey for me. All told I think I put this box together for under $25 - $20 for the box and $5 for the minis I purchased.
Fourth, put it all together. Add a letter sticker to the outside of each drawer, then toss all of your treasures into the corresponding space! And that's it - easy-peasy!

Remember to "stay-tuned" for Part II of The Alphabet Box where I explain how we use ours for learning and where I'll host a little giveaway, too. :)

Linking this post up to: Montessori Monday, The Preschool Corner, Sharing Time, and Tot Tuesdays.

Friday, June 18, 2010

Our Nature Shelf

Since January we've dedicated a little area in our home where we keep the lovely treasures we find outside and where we celebrate the changing seasons. We call it out nature shelf. Nature spaces like these are commonly found in Montessori and Waldorf classrooms and homes.

Generally, I only allow things found in nature or things handmade with natural materials to be put onto the shelf. Here are some close-ups of the goodies on our shelf.

The wooden mushroom, the frame and card, the silks, and the wooden duck all come from here. I needle felted the "pond" and the flower. That sweet little summer time peg person was handpainted by Beneath the Rowan Tree and purchased through her Etsy store.

We recently participated in an international postcard swap and received this beautiful bit of artwork from a child in Singapore. There's a piece of driftwood James found at the beach and inside the bowl are shells we've found locally, some quartz and amethysts (found at a local shop) and a walnut filled with beeswax, which we made earlier this year. The bowl itself is handmade with recycled paper - I found it at a craft market. That sweet little rainbow kitten was made by Ann of Simply Playing. You can buy one here.

James really enjoys our nature space and I often find him touching the items and rearranging the set up. :) I just love having this area available to him - it's such a rich sensory experience and it opens the door to many happy, curious questions such as, "Why is this rock purple?".

I hope you enjoyed my little tour and I'll do my best to post about our ever-changing nature shelf more often.


The Magic Onions and Natural Suburbia each host a weekly blog party where people can link up to share ideas. Click the buttons to check them out!

Thursday, June 17, 2010

Raising Playful Tots Index

My day just got a little brighter! Image my surprise when I found out Counting Coconuts was listed on the Raising Playful Tots Index.
What is the Raising Playful Tots Index? Well, in the creator's own words, it's "...a one-stop shop. Compiled in one place are bloggers who love to play. They promote early childhood play with a variety of play activities and inspirational ideas...".

It's truly an honor to be listed amongst so many fantastic blogs. Go now and check out this list - I guarantee you'll find something new and inspiring!

Monday, June 14, 2010

Montessori Monday

It's been a while since I posted some of our Montessori lessons, so here's a BIG catch up post with activities from the past few weeks. Oh and I took pics of James only if it seemed ok to do so. Truthfully, I'm trying to limit my camera use during our lessons - I think we both find it a bit distracting!

Sensorial

Knobbed cylinders
The cylinders are some of James' favorite Montessori materials. He is a pro at these and it always makes me smile to see how he "hunts" for the correct space by hovering the cylinder over each spot to gauge if it's the right fit. This is exactly how it should be done!

Exploring the playdough gardenJames had tons of fun with this. Unfortunately, the playdough went "bad" after just a couple of uses. I didn't alter my recipe at all, so I think it has to do with the increasing humidity.

Sorting beads
I like these beads because they're all the same color and only differ in size and shape, which requires a bit more attention when sorting. At first James just played with the beads (pretending they were soup, etc.), but when he got around to actually sorting them, he really, really focused on what he was doing. It was so neat to watch him concentrate on each bead.

Practical Life

Rolling and unrolling the mat
I taught James how to do this quite some time ago, but I noticed he was getting a bit lax in the technique, so we revisited it.

Tonging puffs
This took a bit of concentration on James' part because the holes in this ice cube tray and the tongs are smaller than he's used to. He did a great job!

Tonging (fake) strawberries
Initially I put out a this pair of wooden tongs, but they were way too stiff, even for me. I switched to a strawberry huller (how appropriate!), which was perfect because the real challenge in this activity lies in having to pick up the berries by their stems. Not as easy as it sounds, but James did really well.

Pouring water James has mastered dry pouring and truthfully he can pour liquids pretty well too, but I thought he'd enjoy this work simply because it involved water. And he did - he poured and poured and poured. When I introduced this work I used the proper Montessori pouring technique (holding the container with one hand while placing two fingers from the other hand under the spout) and for the first time James imitated me. It seemed really awkward for him though and I didn't object when he modified his grasp.

Pouring beads into two containers
This work involves pouring wooden beads from one container into two and the trick is to stop pouring when each container is just about full. To my utter surprise, he did this perfectly on the first try (even I over poured when I tested it!).

Folding washcloths
This was the first time I introduced folding to James. He LOVED it! Just look at that smile on his face! Interestingly (to me anyway), when I demonstrated how to fold I folded the washcloth upwards, but he folded them downwards. I wondered if this had anything to do with the whole left brain/right brain thing.

Egg slicing activityOh boy was this a favorite! During my presentation James watched my every move intently and when it was his turn to crack, peel and slice the egg, he did a fantastic job. I have quite a few more food preparation activities to share with all of you. I find anything involving food is generally a big hit with kids. :D

Spooning beans
James mastered spooning a long time ago, but he really enjoys these kinds of activities, so I keep putting them out. The little radish cups were a surprise find at the pet store. :)

Geography/Science

USA puzzle map
James is fascinated with this puzzle. Believe it or not, he actually puts it together from start to finish all by himself. He knows quite a few of the states by name and can identify them by their shape, too. Paul and I were surprised when he picked up a piece (Tennessee, I think) and then went to the US map we have on the wall and searched for and found the corresponding state.

Land, water & air
This activity came right out of my training manual. Three bottles, one filled with soil, one filled with water, and the other filled with nothing but air. The balloon accompanies the air bottle and during my presentation, I blew up the balloon to demonstrate the effect of air. We touched and smelled inside of each bottle and then talked about where we could find each of these things in our world. Before my presentation I wondered if all this might go a bit over James' head, but no! He was so interested and totally understood everything I said. Days later, he kept telling Paul and I that the balloon was filled with air and that the earth was made up of land, water and air. :)

Matching cats and dogs
This was a multi-faceted activity in that it involved matching pairs as well as sizes, and it led to some discussion about all the different kinds of cats and dogs in the world. James thought it was funny that a lion was really just a big cat! :)

Caring for a plant and watching it grow
This is a practical life & science experiment all in one. A while back James and I planted some seeds. We've watered and cared for them every day and over time we've watched them grow. We've talked about how the plants grow and what they can be used for. I haven't gone into all the mechanics of the plants (i.e. stem, roots, etc.) just yet, but it's in our near future.

Language

Bottle cap name cards
I first learned about this idea from 1+1+1=1 and it's one of James' favorites. I created the cards in Word, printed and then laminated them. James loves hunting for the matching bottle cap letter and he gets such a kick out of seeing the familiar faces on the cards.

CVC cards
I love these little cards because they provide a control of error in the artwork (e.g. the car is split into 3 parts). James used these by matching up the pictures and then sounding out each letter.

3 part cards
I've been busy printing and laminating 3 part cards on a variety of topics - space, plants & animals, living & non-living, geography. You can find my favorite printables resources here. I'll be introducing a couple of these to James this week.

Category/Sequencing cards
I found these at a flea market and they've got to be circa 1980, but they get the job done. In fact, they opened up some funny dialogue - I had to explain to James what a cassette tape was and the big boombox threw him for a loop. :) He liked the cards though and did really well categorizing them, but we'll work on the sequencing a bit more.

Math

Arithmetic on the abacus
I found this abacus at a second hand store in Connecticut and it was the best $2 I ever spent. Such a great learning tool! James used it quite a bit last year when he was perfecting his rote counting and is now using it to practice addition and subtraction. This is all him, mind you. Paul and I never push any of this stuff on him. I'm constantly amazed at what HE finds interesting!

Art

We finally finished our rainbow collage! We started this back in April and little by little James would work on it, adding a scrap of paper here or there. This was such a great color sorting activity. I simply drew an outline of a rainbow on a big sheet of paper, cut lots of strips of colored construction paper, had James tear the strips up (GREAT fine motor activity) and glue the torn bits onto the outline.

James painted this bit of artwork, which I used to create a pretty little pinwheel. See my tutorial here.

Linking up to Montessori Monday & Preschool Corner - be sure to click the buttons for more ideas!

LinkWithin

Related Posts with Thumbnails